Recently I’ve noticed that my /boot partition has become full and I’ve even had some new kernel updates fail as a result. It seems the culprit is all of the older kernels still lying around on my system even though they are no longer in use. Here are the steps I took in order to remove these old kernels and reclaim my /boot partition space.
A few warnings:
- Always understand commands you are running on your machine before you run them. Especially when they start with sudo.
- Be very careful when removing kernels – you may end up with a system that doesn’t boot!
- My rule of thumb is to only remove kernels older than the most recent 2 (assuming I haven’t had any bad experiences with either of them). This allows me to revert back to a slightly older version if I find something that no longer works in the latest version.
First determine what kernel your machine is actually currently running
For example running the command:
uname -a
prints out the text “4.4.0-45-generic“. This is the name of the kernel my system is currently using. I do not want to remove this one!
Next get a list of all installed kernels
You can do this a few different ways but I like using the following command:
dpkg --list | grep linux-image
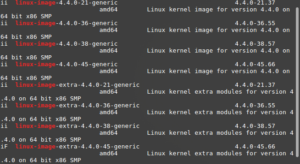
This should print out a list similar to the one in the screenshot below.

From this list you can identify which ones you want to remove to clear up space. On my system I had versions 4.4.0-21.37, 4.4.0-36.55, 4.4.0-38.57 and 4.4.0-45.66 so following my rule above I want to remove both 4.4.0-21.37 and 4.4.0-36.55.
Remove the old kernels
Again this can be done a number of different ways but seeing as we’re already in the terminal why not use our trust apt-get command to do the job?
sudo apt-get purge linux-image-4.4.0-21-generic linux-image-4.4.0-36-generic
and just like that almost 500MB of disk space is freed up!

sudo apt-get purgelinux-image-4.4.0-21-generic linux-image-4.4.0-36-generic
should be sudo apt-get purge linux-image-4.4.0-21-generic linux-image-4.4.0-36-generic
Fixed 🙂